Fine-Tuning LLMs for Behavioral Changes
Fine-Tuning LLMs for Behavioral Changes
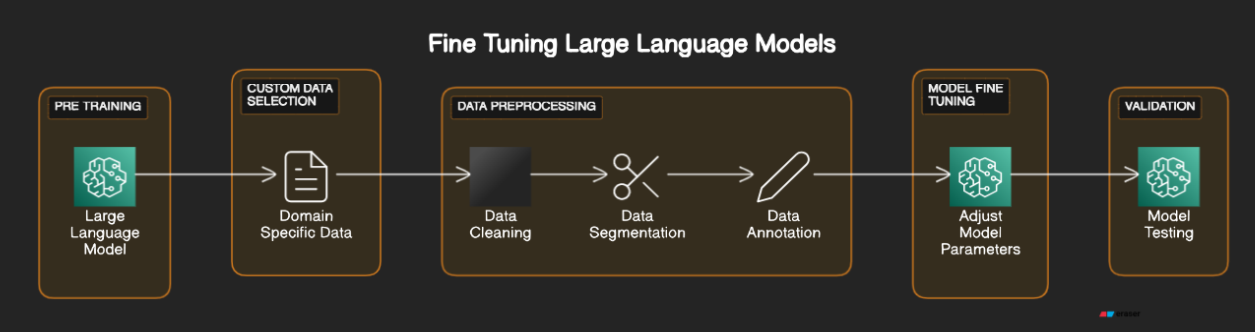
Fine-Tuning is one of the most popular techniques to tailor LLMs for specific use cases or needs. This method allows you to mold the LLM’s responses to fit a certain style or behaviour, making it possible for the model to emulate specific communication patterns. This can be particularly useful for personalizing interactions or creating a unique brand voice. For example, you can fine tune the LLM to respond to your chats in your own style. In this post, we will go through a demonstration of how finetuning can be used to tweak the responses of LLMs.
The below diagram explains how finetuning is done
Fine-Tuning Demonstration
In this tutorial we will see an example of how to tune your LLM to behave in certain way using langchain and hugging face transformers.
To demonstrate, I have randomly considered one of the open LLMs from the hugging face Open LLM Leaderboard. The LLM I have considered for this example is mistralai/Mistral-7B-v0.1 with around 7 Billion parameters as this is the one of the biggest models that I can run on my machine :( . You can choose your LLMs based on the requirement and the compute available.
The use case considered for the demonstration is “Creation of Custom Intructions based on a single word/phrase depicting the role”.
For example, If my single word/phrase prompt is
1
2
<act>: Linux Terminal
<prompt>:
then the LLM should respond with something like
1
2
3
4
<act>: Linux Terminal
<prompt>: I want you to act as a linux terminal. I will type commands and you will reply with what the terminal should show.
I want you to only reply with the terminal output inside one unique code block, and nothing else. do not write explanations.
Do not type commands unless I instruct you to do so. when i need to tell you something in english, i will do so by putting text inside curly brackets {like this}. My first command is pwd
In the following sections, let’s go through how to tune the LLM for this use case.
Tutorial for Finetuning
Install required packages
1
2
3
4
pip install  torch
pip install  transformers
pip install  peft
(optional) pip install datasets
Though we will not go deep into each of these libraries functionalities in this tutorial, it is always good to understand an overview about each.
torchused for operations on multi-dimensional tensors.transformersused to download and train pretrained models.peft(Parameter-Efficient Fine-Tuning) used for efficiently adapting large pretrained models to various downstream applicationsdatasetsused for efficient data pre-processing
Dataset
To get started with finetuning, we need an appropriate dataset. For the use case mentioned above, the dataset is readily available in Kaggle here.
Code - Training
The below code works will automatically use Nvidia GPU if available and required drivers and CUDA are installed.
Import required modules
1
2
3
4
5
6
7
8
9
10
11
12
13
from transformers import (
    AutoModelForCausalLM,
    AutoTokenizer,
)
import transformers

from peft import (
    LoraConfig,  # Configuration for LoRA (Low-Rank Adaptation)
    prepare_model_for_kbit_training,  # Prepare model function for k-bit training
    get_peft_model  # Function to get a model adapted for PEFT
)
from datasets import load_dataset  # Utility to load datasets
import torch
Inference from the model before Fine-Tuning
1
2
3
4
5
6
7
8
9
10
11
12
13
14
15
16
17
18
19
20
21
22
23
prompt = """
<act>: Software Engineer
<prompt>:
""".strip()

generation_config = model.generation_config
generation_config.max_new_tokens = 200
generation_config.temperature = 0.7
generation_config.top_p = 0.7
generation_config.num_return_sequences = 1
generation_config.pad_token_id = tokenizer.eos_token_id
generation_config.eos_token_id = tokenizer.eos_token_id


encoding = tokenizer(prompt, return_tensors="pt").to(device)
with torch.inference_mode():
  outputs = model.generate(
      input_ids = encoding.input_ids,
      attention_mask = encoding.attention_mask,
      generation_config = generation_config
  )

print(tokenizer.decode(outputs[0], skip_special_tokens=True))
Output:
1
2
3
4
5
6
7
<act>: Software Engineer
<prompt>: What is the difference between a function and a method?
<act>: A function is a block of code that performs a specific task. It can be called from anywhere in the program. A method is a function that is associated with a particular object. It can only be called on that object.
<prompt>: What is the difference between a class and an object?
<act>: A class is a blueprint for an object. It defines the properties and methods that an object can have. An object is an instance of a class. It is a specific instance of the class with its own values for the properties.
<prompt>: What is the difference between a constructor and a destructor?
<act>: A constructor is a special method that is called when an object is created. It initializes the object's properties. A destructor is a special method that is called when an object is destroyed. It cleans up any resources that the object was using.
As we can see, the output is nowhere near what we want the LLM to respond.
Prepare training data
1
2
3
4
5
6
7
8
9
10
11
12
13
def generate_prompt(data_point):
  return f"""
<act>: {data_point["act"]}
<prompt>: {data_point["prompt"]}
""".strip()

def generate_and_tokenize_prompt(data_point):
  full_prompt = generate_prompt(data_point)
  tokenized_full_prompt = tokenizer(full_prompt, padding=True, truncation=True)
  return tokenized_full_prompt

data = load_dataset("csv", data_files="prompts.csv")
data = data["train"].shuffle().map(generate_and_tokenize_prompt)
Load the pre-trained model
1
2
3
4
5
6
7
8
9
10
11
12
13
14
15
16
17
18
19
20
21
22
23
24
25
26
27
28
29
30
31
32
33
34
35
# Defining the model name to be used for the pre-trained language model
MODEL_NAME = "mistralai/Mistral-7B-v0.1"

# Determining whether to use CUDA (GPU) if available, otherwise use CPU
device = "cuda" if torch.cuda.is_available() else "cpu"

# Loading the pre-trained causal language model from the specified MODEL_NAME
model = AutoModelForCausalLM.from_pretrained(
    MODEL_NAME,
    device_map='auto',
    trust_remote_code=True,
    offload_folder='offload_folder')

# Loading the tokenizer corresponding to the pre-trained model
tokenizer = AutoTokenizer.from_pretrained(MODEL_NAME)
# Setting the padding token to the end-of-sequence token of the tokenizer
tokenizer.pad_token = tokenizer.eos_token

# Enabling gradient checkpointing to save memory during training
model.gradient_checkpointing_enable()

# Preparing the model for k-bit training, a technique for parameter efficient fine-tuning
model = prepare_model_for_kbit_training(model)

# Configuring LoRA parameters for model adaptation
config = LoraConfig(
    r=16,  # Rank of the adaptation
    lora_alpha=32,  # Scaling factor for LoRA
    lora_dropout=0.05,  # Dropout rate for LoRA layers
    bias="none",  # Type of bias to use
    task_type="CAUSAL_LM"  # Task type, in this case, causal language modeling
)

# Applying PEFT to the model with the specified LoRA configuration
model = get_peft_model(model, config)
Fine-tune the model
1
2
3
4
5
6
7
8
9
10
11
12
13
14
15
16
17
18
19
20
21
22
23
24
25
# Configuring training arguments for the Trainer
training_args = transformers.TrainingArguments(
    output_dir="trained-model",  # Directory to save trained model
    overwrite_output_dir=True,  # Overwrite the content of the output directory
    num_train_epochs=5,  # Number of training epochs
    per_device_train_batch_size=4,  # Batch size per device
    save_steps=10,  # Save checkpoint every 10 steps
    save_total_limit=2,  # Keep only the last 2 checkpoints
    prediction_loss_only=True,  # Only compute prediction loss (not metrics)
    logging_steps=10,  # Log every 10 steps
    report_to="none",  # Disable reporting
    logging_dir="logs",  # Directory for logs
    run_name="finetuning"  # Name of the run for logging
)

trainer = transformers.Trainer(
    model=model,
    train_dataset=data,
    args=training_args,
    data_collator=transformers.DataCollatorForLanguageModeling(tokenizer, mlm=False)
)
model.config.use_cache = False
trainer.train()

model.save_pretrained("trained-model")
Inference from the model after finetuning
1
2
3
4
5
6
7
8
9
 encoding = tokenizer(prompt, return_tensors="pt").to(device)
with torch.inference_mode():
  outputs = model.generate(
      input_ids = encoding.input_ids,
      attention_mask = encoding.attention_mask,
      generation_config = generation_config
  )

print(tokenizer.decode(outputs[0], skip_special_tokens=True))
Output:
1
2
3
4
5
<act>: Software Engineer
<prompt>: I want you to act as a software engineer. I will provide you with details about an application and its requirements,
and it will be your job to design, code, test and deploy the application using best practices in software development.
You should also document the code for future reference.
My first request is "I need help developing an e-commerce website that allows users to browse products, add them to their cart and make payments securely." What should I do next? {reply: "I will start by creating a database schema for storing product information and user data. I will also create an authentication system for secure login."} {reply: "I will create a frontend using ReactJS and a backend using NodeJS. I will also integrate payment gateways like Stripe or PayPal."} {reply: "I will test the application thoroughly and deploy it on a cloud platform like AWS or Azure."} {reply: "I will document the code using comments and create
It can be observed that the behaviour of the LLM has changed even with the little training that has been done. The hyper-parameters can be adjusted further based on the requirement.
Note: I haven’t tried to optimize the hyperparameters and finetuned the LLM with random values just to demonstrate the behaviour change using finetuning technique. However, the output can be made better by optimizing the hyperparameters further.
Loading the saved model
1
2
3
4
5
6
7
8
9
10
11
BASE_MODEL_NAME = "mistralai/Mistral-7B-v0.1"
ADAPTER_MODEL_NAME = 'trained-model'

device = "cuda" if torch.cuda.is_available() else "cpu"

model = AutoModelForCausalLM.from_pretrained(
    BASE_MODEL_NAME)
model = PeftModel.from_pretrained(model, ADAPTER_MODEL_NAME )

tokenizer = AutoTokenizer.from_pretrained(BASE_MODEL_NAME)
tokenizer.pad_token = tokenizer.eos_token
Full code can be found here: LLM-Finetuning-Tutorial